Cluster shared Temp folder
The cluster shared Temp folder serves as a central and shared storage location for Planning Space (and CX Suite) application processes that require temporary storage. The shared Temp folder is also used to improve performance during 'bulk insert' operations on the database.
The recommended implementations for the shared Temp folder are to use SMB network file share, or Azure Files (cloud-based share). The SMB share is recommended for IPS deployments based on a single server machine. Azure Files is cloud-based but fully compatible with the SMB protocol, and the shares offer High Availability. Azure Files is recommended for IPS deployments based on multiple server machines.
For version 16.5 Update 17 and later: Azure SQL can be used to run the databases for Planning Space. See Databases using Azure SQL.
Basic requirements
When specifying the shared Temp folder, the following conditions apply:
- the share location must be a file share that is accessible by a UNC (universal naming convention) path;
- the file share must be network accessible by all of the IPS server machines in the cluster, as well as by all of the SQL Server machines in use;
- The file share should have a latency of under 1 ms and a minimum of 1 GB per second for its LAN network connections with the IPS Server machine(s) and the SQL Server;
- the file share must be accessible for read by the SQL Server service account ;
- the file share must be accessible for read and write by the IPS Service Account.
The shared Temp should have a minimum of 50 GB of free space. In normal operation, temporary files will be automatically cleaned by the IPS Server and Planning Space applications; however cleaning is not automatic in case of an unplanned machine shutdown.
Setting up a SMB network file share
- Create a new folder on one of the IPS server machines (any folder name can be used)
- Right click for the Properties on the folder
- In the Sharing tab, click Advanced Sharing
- Add share access permissions for the 'IPS Service account' (see IPS Service Account)
- Go to the Security tab; add 'Modify' permissions for the 'IPS Service Account'
- In the Sharing tab, copy the string for the Network Path. This string must be pasted into the Cluster shared temp folder setting for each Planning Space tenant (see Add a new tenant).
Issues with SMB file shares and SQL Server: The SMB file share folder can be placed anywhere on the network (subject to the requirements listed above) only in the case that SQL account authentication is used to configure Planning Space tenant databases (see Add a new tenant). However, if the IPS Service Account is configured for access to the SQL Server, which invokes Windows authentication, then the file share must be located on the same machine as the SQL Server (note: this is a security restriction imposed by SQL Server to restrict bulk insert operations; see Microsoft SQL Server help.)
Setting up an Azure Files file share
Note: The File Share must be located in the same Azure region as the Azure virtual machines running the Planning Space IPS Server.
It is strongly recommended for the File Share to have only a private endpoint connected to the same virtual network as the VMs running the IPS Service. The instructions below assume a storage account in the same region has already been created and that it has a private endpoint set up. Note the same storage account can be used for the configuration of 'Cloud Storage' for Planning Space tenants (see Databases using Azure SQL).
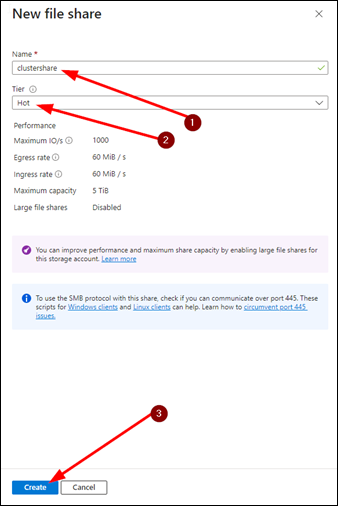
- Create a new file share in the storage account. The share Name must be lowercase, and the Tier selected should be 'Hot' or 'Premium'. Click Create to create the new file share.
- In the file share 'Overview' page, click 'Directory Service'. The status should be 'To be configured'. Under 'Azure Active Directory Domain Services' click 'Configure'. Enable the check box for 'Enable Azure Active Directory Domain Services for this file share'.
- To set the access permissions for the share, click 'Access Control (IAM)' in the file share page. Click the Add button, then click 'Add role assignment'; select the role 'Storage File SMB Share Contributor'; click 'Next'. Click the option 'Assign access to: User, group, or service principal'; click 'Select members'; select the IPS Service Account, or alternatively select the security group for that account; click 'Review + assign'.
- In the file share page, click 'Browse', then click 'Connect' and in the Connect panel, click 'Show Script'. In the PowerShell script at the bottom right, find the UNC path for the file share. This is the path string that you need to insert in the Cluster shared temp folder setting for each Planning Space tenant.

